
Development Plan
My idea is to create a
series of images that address stereotypical views of people who live on council
estates. I am doing this because I was brought up and still to this day live on
a council estate and I’m sick of the way that some people, who may I add have
never even been on a council estate, stereotype and comment on the ‘sort of
people’ that live on them – in front of me completely unaware that I am
actually from there myself, until I inform them and this is my way of
expressing that photographically!
I am going to convert this idea into a
series of images aimed to provoke and challenge the audience by taking
silhouette portraits and adding in provoking text (including some of the most
memorable comments that I’ve heard made before) on Photoshop. The significance of having a silhouette
image combined with ‘judging’ text is aimed to visually suggest that the viewer
cannot see the person that has been stereotyped so therefore questioning how
they know if it is true or not. I’m planning to approach this by over
stereotyping because I believe that the outrageousness will get more of a
reaction from the audience.
Technically, I intend
to achieve this by taking a series of silhouette portrait images of different
people in the studio –This will be achievable by the use of high key lighting
with only the background, that will be white, lit by two flash heads with
umbrellas, no light is to hit the model at all, to ensure complete
non-identification.
Once I have obtained,
reviewed and am happy with the images I have captured I am going to transfer
the RAW files on to the computer where they will be opened in the Photoshop RAW
dialog box where I will administer slight adjustments to ensure they’re
perfect for this project before opening them in the regular Adobe Photoshop
environment where I will add in text. Before applying text I need to find
appropriate fonts for this type of work, I can do this by browsing the ones
already included in Photoshop or by downloading new ones from the Internet. When
all of the text is added and the final image files are ready I am going to
export them as TIFF files.
I will present the
images as A3 sized prints, printed by myself on the professional photo printers
that I have access to. I am also going to display my final images digitally
online, on this blog as well as my website and flickr account.
Online Research
Below are three examples of silhouette portraits that I've found from flickr.com.

© Julian Chan, Flickr
This is an image that has been taken in a studio, I have chosen to include this image into my reseach as you can still see some colour, so it isn't a complete silhouette -something that I find quite interesting although it's not something I'm planning to use for my final images. It is also very clear what is going on in this image.
© Lisa Swahn, Flickr
Another studio shot, this time there is no colour on the main subject at all, this making the image seem flat -An effect that I'd like to achieve in my own work.

© flallier, Flickr
The final image that I have chosen to include is, as you can see, different from the other two it seems to have been taken on location giving this image more context and a touch of mystery - this isn't entirely relevant to my own work but I feel it is an area that I could come back to and explore at another time.
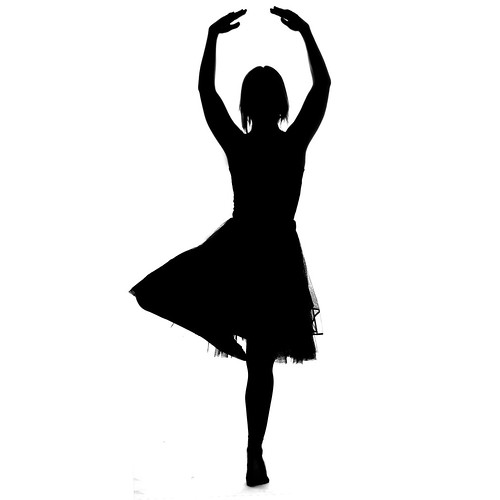
My Experimental Images


Here are few of my own images, these images were taken in a studio, they were for a work assignment but I've decided to use them for this experiment. When I shot these images I set up the equipment to light up the models that I was photographing but for this project I want silhouette images to conceal the identity of the people I am photographing. This is just to make the statement that the viewer can't see the model therefore can't possibly know if what I'm going to say is true or not. So that's where this experiment happened, I know how to set up high key lighting in the studio to create the silhouette effect but I thought 'how else can I do this?'
So here's what I've done here: After I opened up all all of the images in Adobe Photoshop I went through them one by one, repeating the same process.
I went into Layers and created a new Curves adjustment layer, once the dialog box had opened up I moved the point on the right hand side from the top right corner to the bottom right corner, this changing the output from 255 (white) to 0 (black)
this resulted in the image turning black, with no detail at all.
 The next part of the process was to invert the new layer adjustment, I did this by selecting the layer mask (which at the time was a white square, as seen in the screenshot on the right) and used the keyboard shortcut 'command I' ( I was on a mac) the box then turned black and the image changed back to how it was before I applied the layer. All that is left is to do now is to 'paint' the adjustment back in, I did this by selecting the paintbrush tool changing the primary colour to white and, making sure that the mask is selected, painting the adjustment in on the actual image. I decided to use a feather edged brush to achieve, in what I'd like to call 'ghostly edges'
I showed one of the models the final result and she couldn't identify that the image was actually of her so that proves that the result is quite successful for what I'm aiming for!
Ideas for the text

Here's a copy of my notes on the different stereotypes that I can think of that fit and the combinations of how I think it will go together. Just click on the image to see it enlarged.
I think I'm going to go with the 'formula' idea first and see how that goes, the only definite thing at this stage is that the text will be exaggerated to provoke the audience.
Below are three examples of silhouette portraits that I've found from flickr.com.
© Julian Chan, Flickr
This is an image that has been taken in a studio, I have chosen to include this image into my reseach as you can still see some colour, so it isn't a complete silhouette -something that I find quite interesting although it's not something I'm planning to use for my final images. It is also very clear what is going on in this image.
© Lisa Swahn, Flickr
Another studio shot, this time there is no colour on the main subject at all, this making the image seem flat -An effect that I'd like to achieve in my own work.
© flallier, Flickr
The final image that I have chosen to include is, as you can see, different from the other two it seems to have been taken on location giving this image more context and a touch of mystery - this isn't entirely relevant to my own work but I feel it is an area that I could come back to and explore at another time.
My Experimental Images


Here are few of my own images, these images were taken in a studio, they were for a work assignment but I've decided to use them for this experiment. When I shot these images I set up the equipment to light up the models that I was photographing but for this project I want silhouette images to conceal the identity of the people I am photographing. This is just to make the statement that the viewer can't see the model therefore can't possibly know if what I'm going to say is true or not. So that's where this experiment happened, I know how to set up high key lighting in the studio to create the silhouette effect but I thought 'how else can I do this?'
 | |
| Screenshot: Adobe Photoshop CS5 |
 | |
| Screenshot: Adobe Photoshop CS5 |
So here's what I've done here: After I opened up all all of the images in Adobe Photoshop I went through them one by one, repeating the same process.
I went into Layers and created a new Curves adjustment layer, once the dialog box had opened up I moved the point on the right hand side from the top right corner to the bottom right corner, this changing the output from 255 (white) to 0 (black)
this resulted in the image turning black, with no detail at all.
 |
| Screenshot: Abode Photoshop CS5 |
I showed one of the models the final result and she couldn't identify that the image was actually of her so that proves that the result is quite successful for what I'm aiming for!
Ideas for the text

Here's a copy of my notes on the different stereotypes that I can think of that fit and the combinations of how I think it will go together. Just click on the image to see it enlarged.
I think I'm going to go with the 'formula' idea first and see how that goes, the only definite thing at this stage is that the text will be exaggerated to provoke the audience.
Difficulties Booking the Studio
I'm having difficulties in booking the studio for my shoot, I have my plan and everything ready but all of the time slots have been taken up, it'd be so much easier if I had access to studio equipment from home!
I hadn't booked the studio before because I wanted to make sure that I had sorted out the models and made sure that the time was convenient for them, also to try to avoid unnecessary booking of the college studio to prevent others from using it. I think for next time I will have to book anyway and if the models can't make it I'll have to put together a backup plan or just improvise at the time.
With the deadline fast approaching and no time slots at all until after the assessment I am going to have to use the images that I experimented with earlier to visually represent my idea and explain exactly what I was going to do and talk about the difficulties that I've faced. So I am now going to add in the text on to the images from before and try to get them printed in time for the deadline -If I can't do this then I will have to present them on screen.
After the assessment I plan to do the shoot and get the final images edited and printed at A3 size.
Adding Text

As you can see I have used the images that I experimented with earlier on in this post.
I chose to include the 'Council Estate =' formula idea with the quotes as it gives the viewer more information, therefore giving them more of an understanding of how to interpret what my work is about.
The quote didn't really stand out when it was just placed on to the background so I decided to add in a red rectangle shape, I changed the blend mode of the shape from 'normal' to 'color' - this made the shape translucent and gave a nice effect when touching the edges of the silhouette, now all that was left to do with this area was to place the quote text on top of the shape.
 I wanted to create the
effect that the 'council estate =' idea was stamped on to the silhouette
to visually represent stereotyping, I achieved this by picking a
different font from the one I had used before so it looked a little out
of place. I then went into the blending options and selected 'stroke'
this gave me a new dialog box where I could pick the colour and change
various options for the 'stroke' effect, I changed the colour to red and
changed the size of the effect to make it stand out. Once I had
completed this for one image I just copied it onto the next and changed
the text to keep things consistent, to complete the effect I rotated the
"stamp" text differently for each image.
I wanted to create the
effect that the 'council estate =' idea was stamped on to the silhouette
to visually represent stereotyping, I achieved this by picking a
different font from the one I had used before so it looked a little out
of place. I then went into the blending options and selected 'stroke'
this gave me a new dialog box where I could pick the colour and change
various options for the 'stroke' effect, I changed the colour to red and
changed the size of the effect to make it stand out. Once I had
completed this for one image I just copied it onto the next and changed
the text to keep things consistent, to complete the effect I rotated the
"stamp" text differently for each image. 

Submitted Work


As you can see I have added one more piece of text on to my images before submitting, I have included this text (which says 'OR DOES IT?) to prompt the viewer to question what the images are saying, I have done this because it became apparent to me that some people found it difficult to interpret what I was trying to do when looking at the images from before.
I am going to present my final images on screen because there isn't enough time left for me to print before the assessment.
No comments:
Post a Comment